
In a previous post, I provided instructions on how to add a signature to the Outlook Web App. In this post, I provide instructions on how to add a signature to the Outlook desktop client. The process is the same for Outlook 2013, 2016, and Office 365 versions.
Create a New Signature
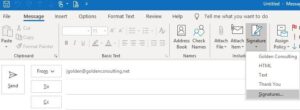
1. With Outlook open, start a new email message. From the toolbar, click the drop-down arrow under Signature and select Signatures (Alternatively, you can go to File > Options > Mail > Signature).
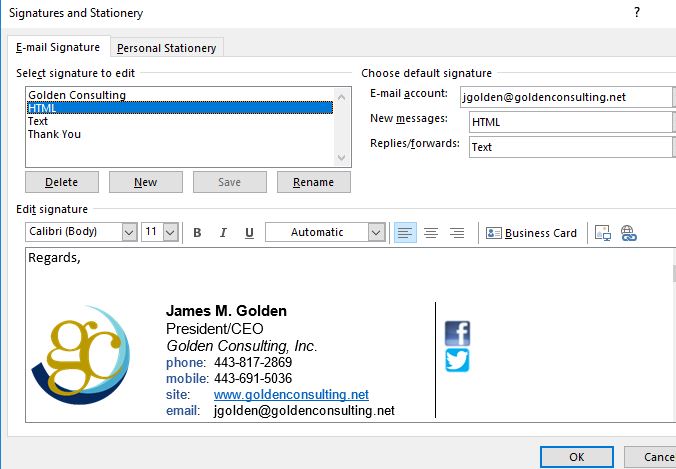
2. In the Signatures and Stationery windows, click New.
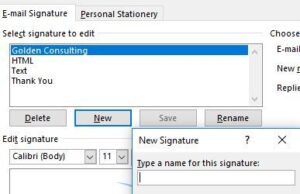
3. Enter a descriptive name for your signature and click OK.
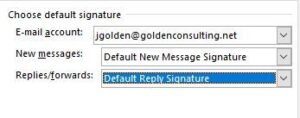
For example, I have signatures named HTML and Text to use depending upon the format of my message. You might have one named “Default New Message Signature” to use for creating new messages, and another named “Default Reply Signature” to use only when replying to messages. Another option is to create and name signatures based on your job titles or roles, if you more than one. Just make it description so that you know what it contains and when to use it.
4. In the Edit Signature window, enter and format your signature as you would like it to appear.
If creating an HTML signature, I find that it’s easier to create a signature in Word, and then copy-and-paste into the window.
5. When finished, click Save.
Editing Your Signature
1. In the Signatures and Stationery window, select your signature.
2. Make the desired changes and click Save.
Note that you can go back and any time to modify your signatures.
Choose Your Default Signatures
1. In the upper-right corner, choose the signature to be automatically attached when sending new messages.
2. Choose a signature (or no signature) to use for replies and forwards.
3. When done creating or editing your signatures and selecting your default signatures, click OK.